Domain Registration, DNS and Security Configuration
Supporting document status: Complete
About
This document is a supporting document for the project Repurposing My Old Phone into an ARM Linux Web Server. This document is about buying a domain name, configuring DNS, and applying the security features provided by the DNS registrar.
NOTICE: DNS SECURITY CONFIGURATION IS NOT A SUBSTIUTE FOR HARDENING AND SECURING YOUR SERVER. Please follow Security Hardening and Assessment of a Self-Hosted ARM Linux Web Server if you need help securing your server.
Buying a domain
Buying a domain is not strictly necessary, so before you spend any money, learn what happens if you buy a domain vs if you don't below.
At the most basic level, your server is reachable through an IP address. A domain name provides a human-readable name that DNS can resolve to an IP address. Which means, just knowing the IP address is enough to visit a website. For instance, to visit www.google.com, you could put 142.250.65.78 (this may change as time passes) in the URL bar and you land at www.google.com.
So why buy a domain name, since IP address is free(not quite)?
If you skip buying a domain, and just get an IP address, you should tell people that your website is at xxx.xxx.xx.xx instead of saying your website is at www.awesomecoolreader.com. The problem is that people can't remember IP addresses as easily as website names, and if you can't obtain a static IP address (common case in residential networks and home labs), your website's IP address keeps changing, so today it's xxx.xxx.xx.xx, tomorrow it is xyy.yy.yx.xy. So, people can't access the website after the IP address has changed, and worse, even you can't access it before you figure out what it has changed to. There are many other reasons why DNS servers are used to resolve domain names into IP addresses instead of just using the IP addresses, but these two reasons should help you make your decision. If you don't care about other people visiting your website, you can skip buying a domain name, but if you want easier access, and want to present it to people, buying a domain name is a better choice.
Here is the a better explanation that you will definitely understand.
Buying a domain name:
- Aura +10000 points
- You're better than everyone else
- -10$
Running straight up IP address:
Yes, you read that correctly! you can get domain names for around 10$ a year (do look at the renew cost tho). So if you decided to buy a domain name, you can follow along with the rest of this section. But if you decided to not buy a domain name right away, I want to tell you to not worry about it and still follow along with this section in case you ever change your mind.
You can do your own research and find an fitting domain registrar. For me, it was Cloudflare Registrar. I wasn't picky about the registrar for my first website, but Cloudflare Registrar exceeded my expectations. The amount of support, and security you get from Cloudflare just by buying one of their inexpensive domain names is huge. So follow me if you picked Cloudflare Registrar too. If you decided to go with another registrar, this document can still provide you with some valuable information.
You can search Cloudflare Registrar in google, then navigate to products, or follow the link https://www.cloudflare.com/products/registrar/. Then search for the domain name you want to obtain. You might not find the exact domain name you were looking for in which case you have to make a little tweak on the name like you did when you made your Instagram account. There are a lot of options including different TLDs (the thing after the .), but to increase your aura, you can try and get the .com TLD. www.awesomecoolreader.sketchyTLD might raise some side eyes, whereas www.awesomecoolreader.com is easily accepted. I am buying the name sushantadk.com.
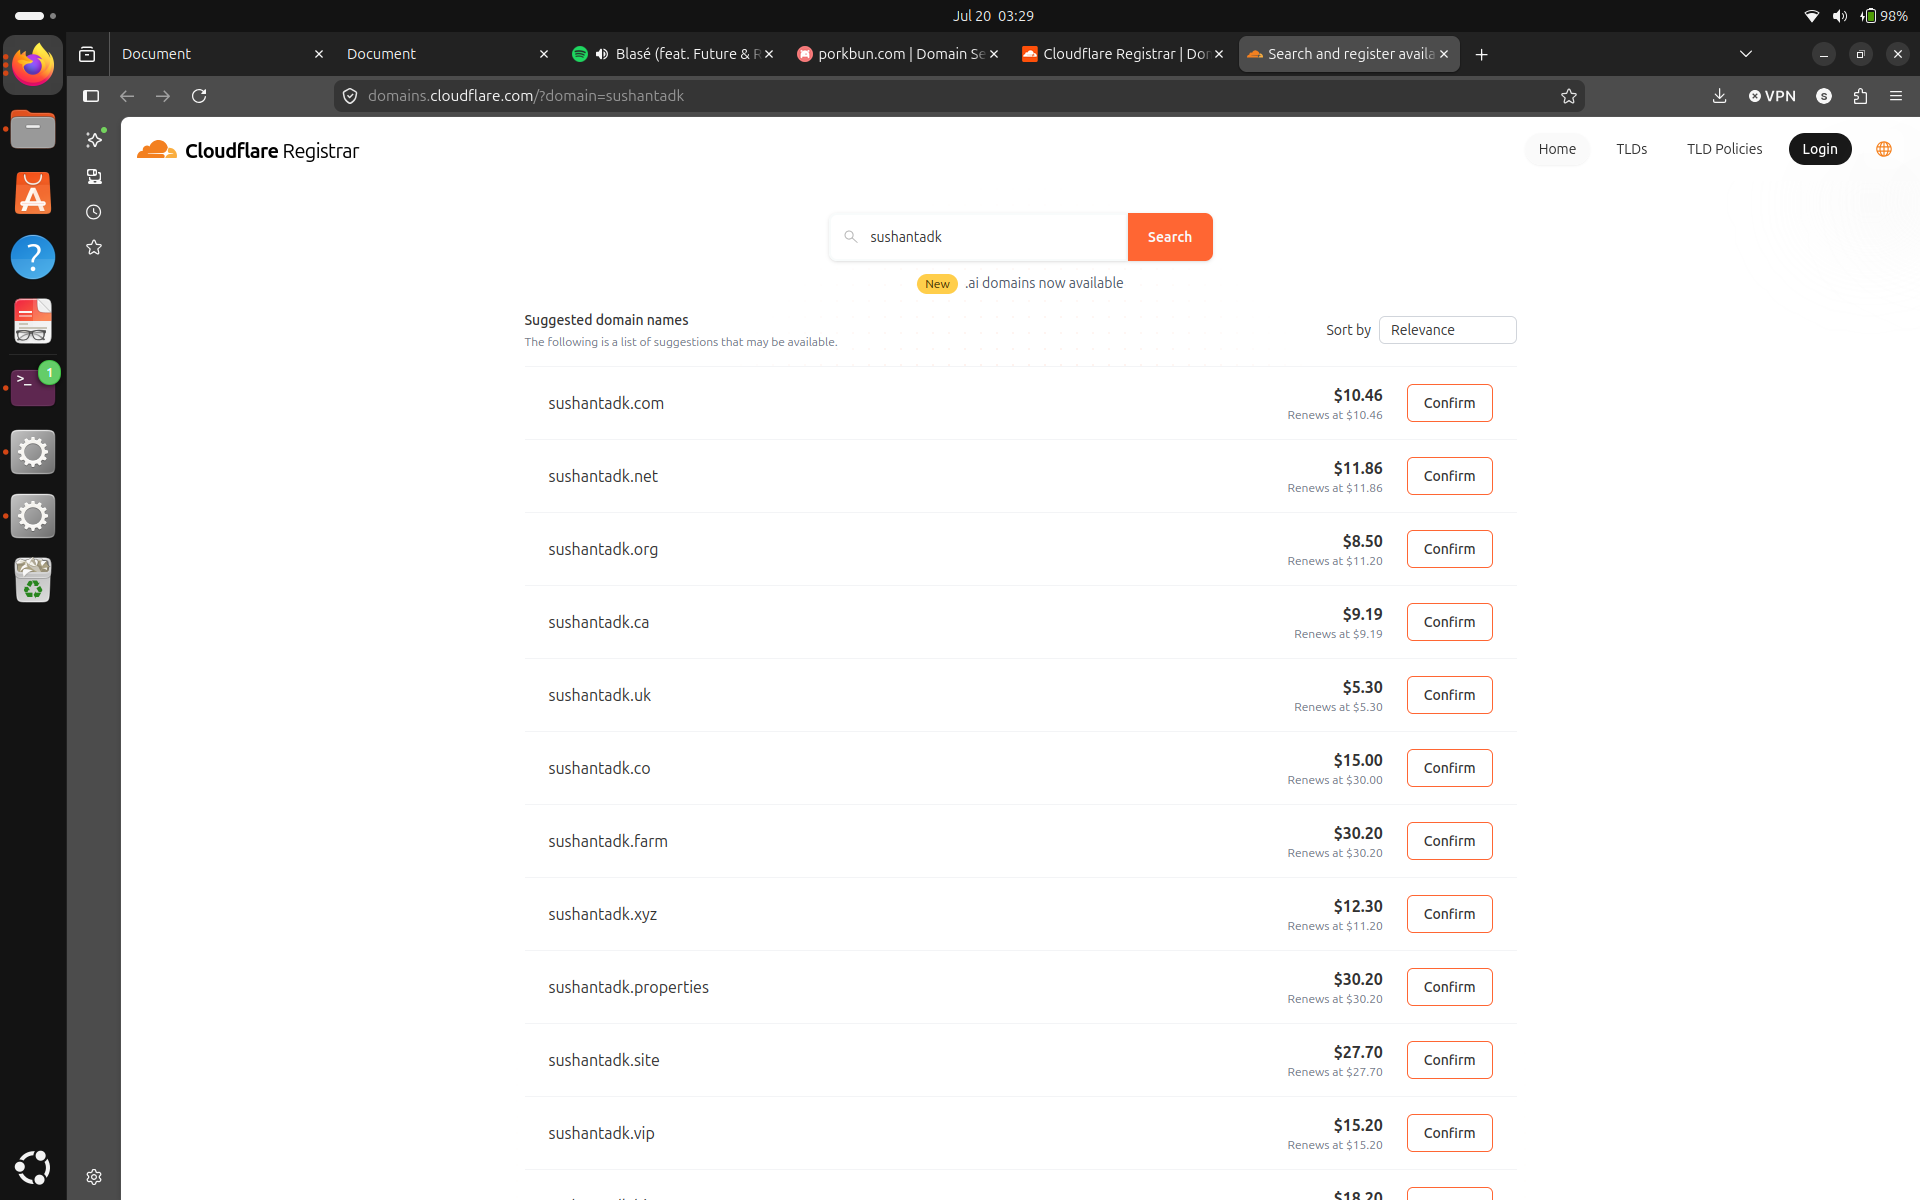
Find the name you like, then give Cloudflare all your info and money and you should be good to go!
Assigning an IP address to the domain name
For people to visit your website through the domain name, the domain name needs to know where your website is. So, we need to assign an IP address to the domain name.
DNS servers host data in zones. Right now, we are only concerned with the A zone. This zone is also called a host record which records the hostname and IPv4 address. When a DNS client queries the name using forward lookup request, DNS responds with the IPv4 address from this record.
To assign the IP address, let's first login to Cloudflare Registrar. On the right sidebar, click on Domains, then overview. Find your domain and click on it. Again, from the sidebar, click DNS then Records. Choose the option to Add record. Select:
- type: A
- name: @
- IPv4 address: 'yourPublicIPv4Address'
- enable proxy
- save
We enter @ for Name because it represents the root domain (zone apex). In other words, this record applies to awesomecoolreader.com rather than something.awesomecoolreadr.com.
We enter the public IPv4 address so that DNS can direct requests for our domain toward our network, and you can obtain it by running curl ipinfo.io/ip from your terminal or by visiting https://whatismyipaddress.com/.
Finally, we enable proxy. This is one of Cloudflare's most useful features.
Without the proxy enabled (gray cloud), someone visiting your website asks DNS where awesomecoolreader.com is located. DNS replies with your home's public IP address, and their browser connects directly to your server.
With the proxy enabled (orange cloud), DNS returns one of Cloudflare's IP addresses instead. Visitors connect to Cloudflare first, not directly to your home. Cloudflare then forwards the request to your server, receives the response, and sends it back to the visitor.
Visitor -> Cloudflare->Your Home Server
Visitors connect to Cloudflare instead of directly connecting to the origin. This helps hide the origin IP, although additional measures are needed to prevent attackers from discovering and bypassing the origin. This helps protect your origin server from direct exposure and also enables Cloudflare features such as caching, DDoS protection, TLS termination, rate limiting, firewall rules, and more, which we'll discuss later.
Now we got awesomecoolreader.com working. But what if people search for www.awesomecoolreader.com? The 'www' part (or any other top level domain) is handled through a canonical name(CNAME), which is a DNS record that maps one domain name to another. In this case, www.awesomecoolreader.com can mapped to awesomecoolreader.com which has our IP address.
To do this, click on Add record again. Select type: 'CNAME', Name: 'www', and Target: 'yourRootDomain', and save. Now you should have two DNS records, A record with your root domain pointing to your public IP address, and CNAME record with your alias pointing to your root domain.
So now, Cloudflare knows that if someone searches awesomecoolreader.com, it can get the recources from your IPv4 address, and if someone searches www.awesomecoolreader.com, since the CNAME is pointing to the root domain, cloudflare handles it same as the root domain.
Using the tools provided by our domain registrar
My domain registrar is Cloudflare, which provides decent security features. The way I'm configuring security is by looking through every option availabe in the Clouflare website, but I will document only the security related, and standard first website configuration under the free plan here. It might seem like an overkill but for a first time configuration, I see it as an necessary step.
Overview
Let's login on the Cloudflare website, and on the right sidebar, let's go to Domains->Overview->yourDomain.
The overview shows that over the course of a week, my website received 561 visitors. A handful of these, possibly 61, were likely my friends and family. I can tell because July 23 is when I announced my website on my IG and I had 61 unique visitors that day. After July 23, the number of unique visitors dropped to 0 for two days, and exploded after that. I suspect July 26 is when automated crawlers and scanners discovered my website, although this is only a hypothesis based on the traffic pattern.
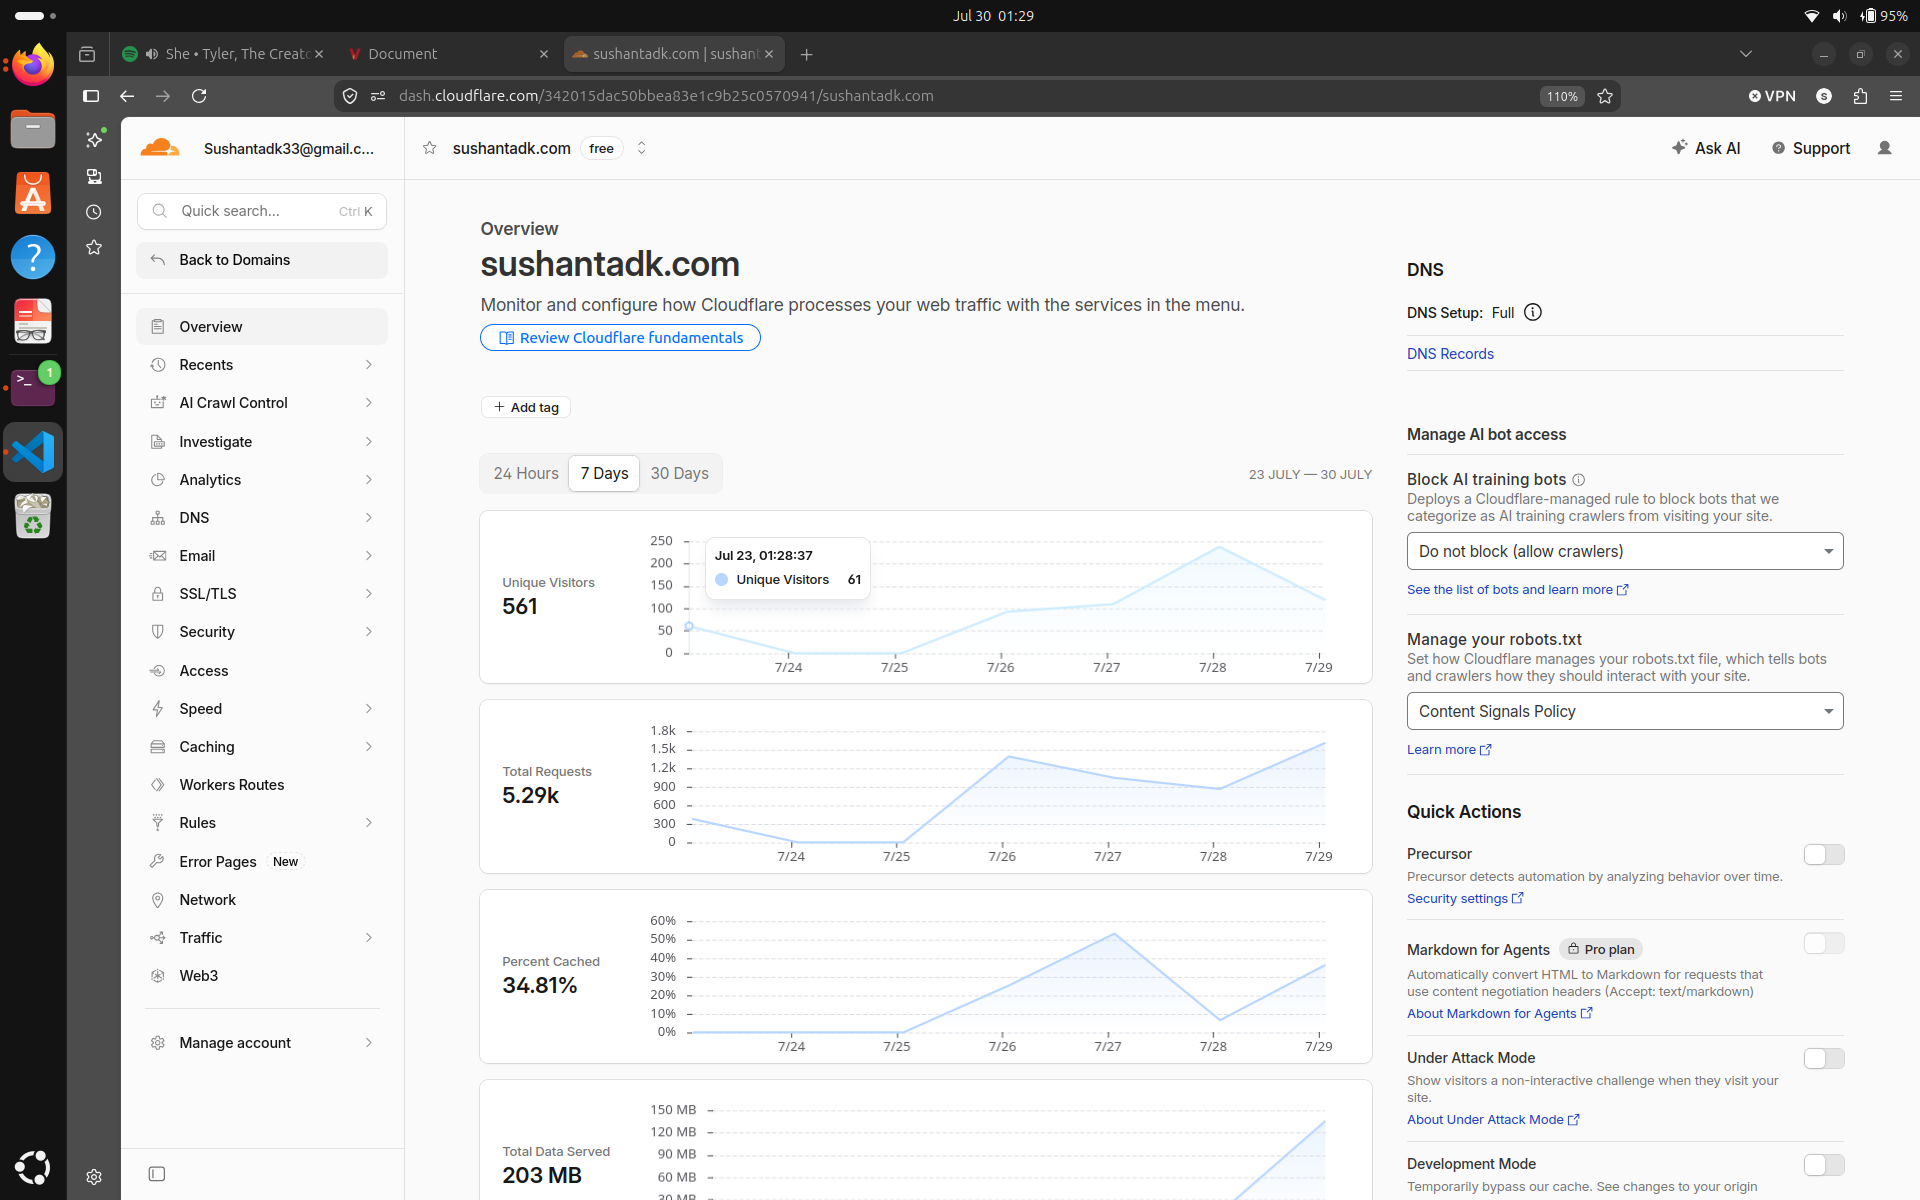
Couldn't it be regular people searching and browsing on the internet? Well, I'd be very flattered if my website can get around 500 views every week but I dont't think that's the case. My website isn't currently appearing in Google search results, and I haven't submitted it to Google's indexing tools yet. So for anyone to access my website, they need the exact domain name, and I fear the bots have discovered just that.
The internet is full of automated scanners preying on websites and servers with weak security controls. Even though some visitors may not have malicious intent, we have to be prepared for the worst case scenario. Following list is what I did on this page, you may need to tweak some things to match your needs.
- Block AI training bots on all pages. I do not want to contribute to judgement day. AI has gotten too smart already.
- Under Manage your robots.txt, choose 'Set your preference to block training in robots.txt'. This is an indication, that your content shouldn't be used for AI training.
- Enable precursor to detect sophisticated bots.
- Leave everything else on the page intact.
AI Crawl Control
Under AI crawl control -> Overview, enable 'Managed robots.txt'. Next, the trace feature under Investigate looks interesting. It is still in beta version as of this writing, and I don't need to trace anything right now but I will definitely come back to check on this later.
Analytics
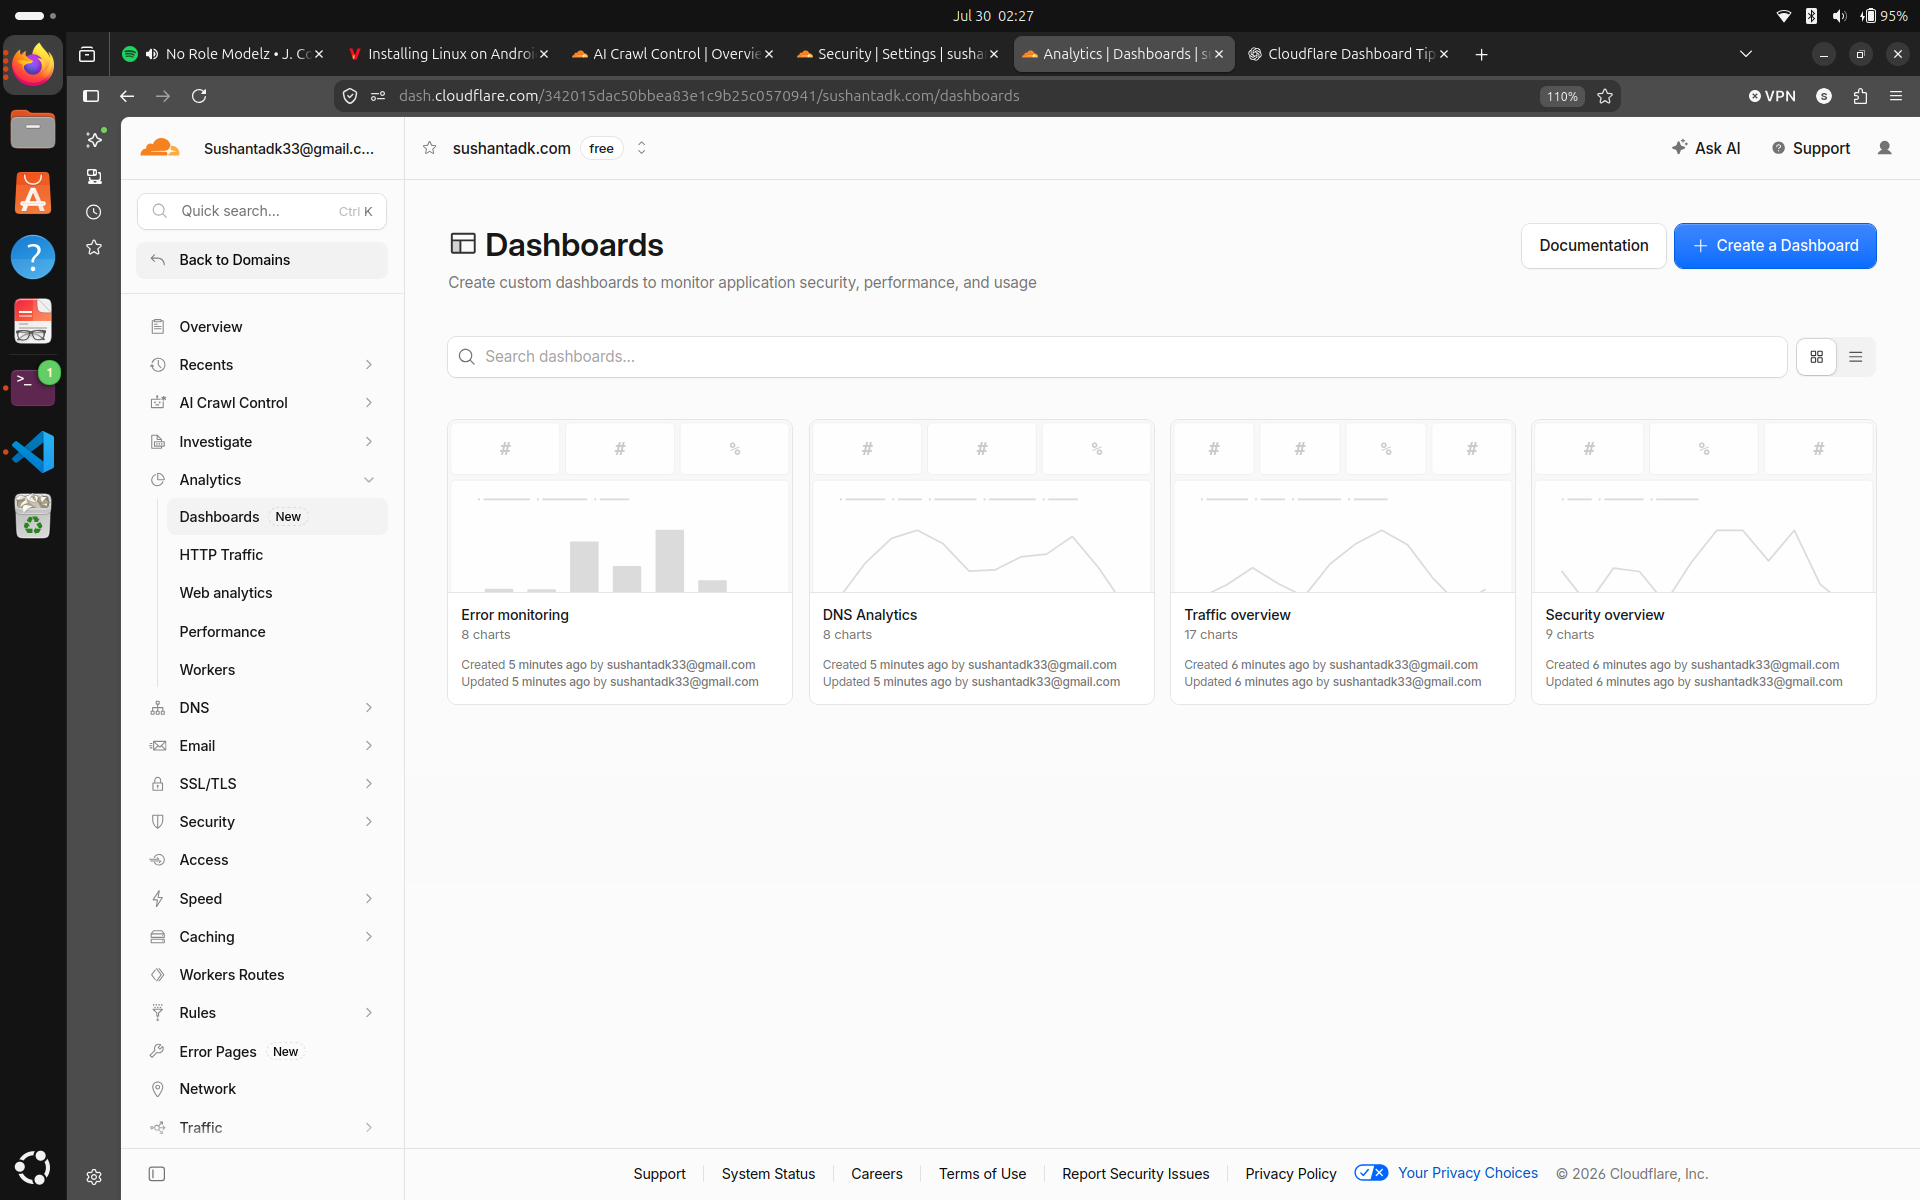
Moving on to Analytics->Dashboards, it says that we don't have a dashboard yet. Let's change that. Click on 'Create a Dashboard', and from the available templates, add Security Overview, Traffic Overview, DNS Analytics, and Error Monitoring. These are self explanatory dashboards, and they can provide you quick and easy access on a specific aspect, like security, on your website.
SSL/TLS
For the SSL/TLS section, make sure you have installed a certificate from a publicly trusted CA or a valid Cloudflare Origin CA certificate on your origin server. You can find visit Building a server if you need some help. After installing a certificate, you should be able to use HTTPS traffic. Go to the overview section under SSL/TLS and click on 'configure'. Set the encryption mode to Full (Strict). This encrypts traffic between Cloudflare and your origin and requires Cloudflare to validate the origin certificate.
Security
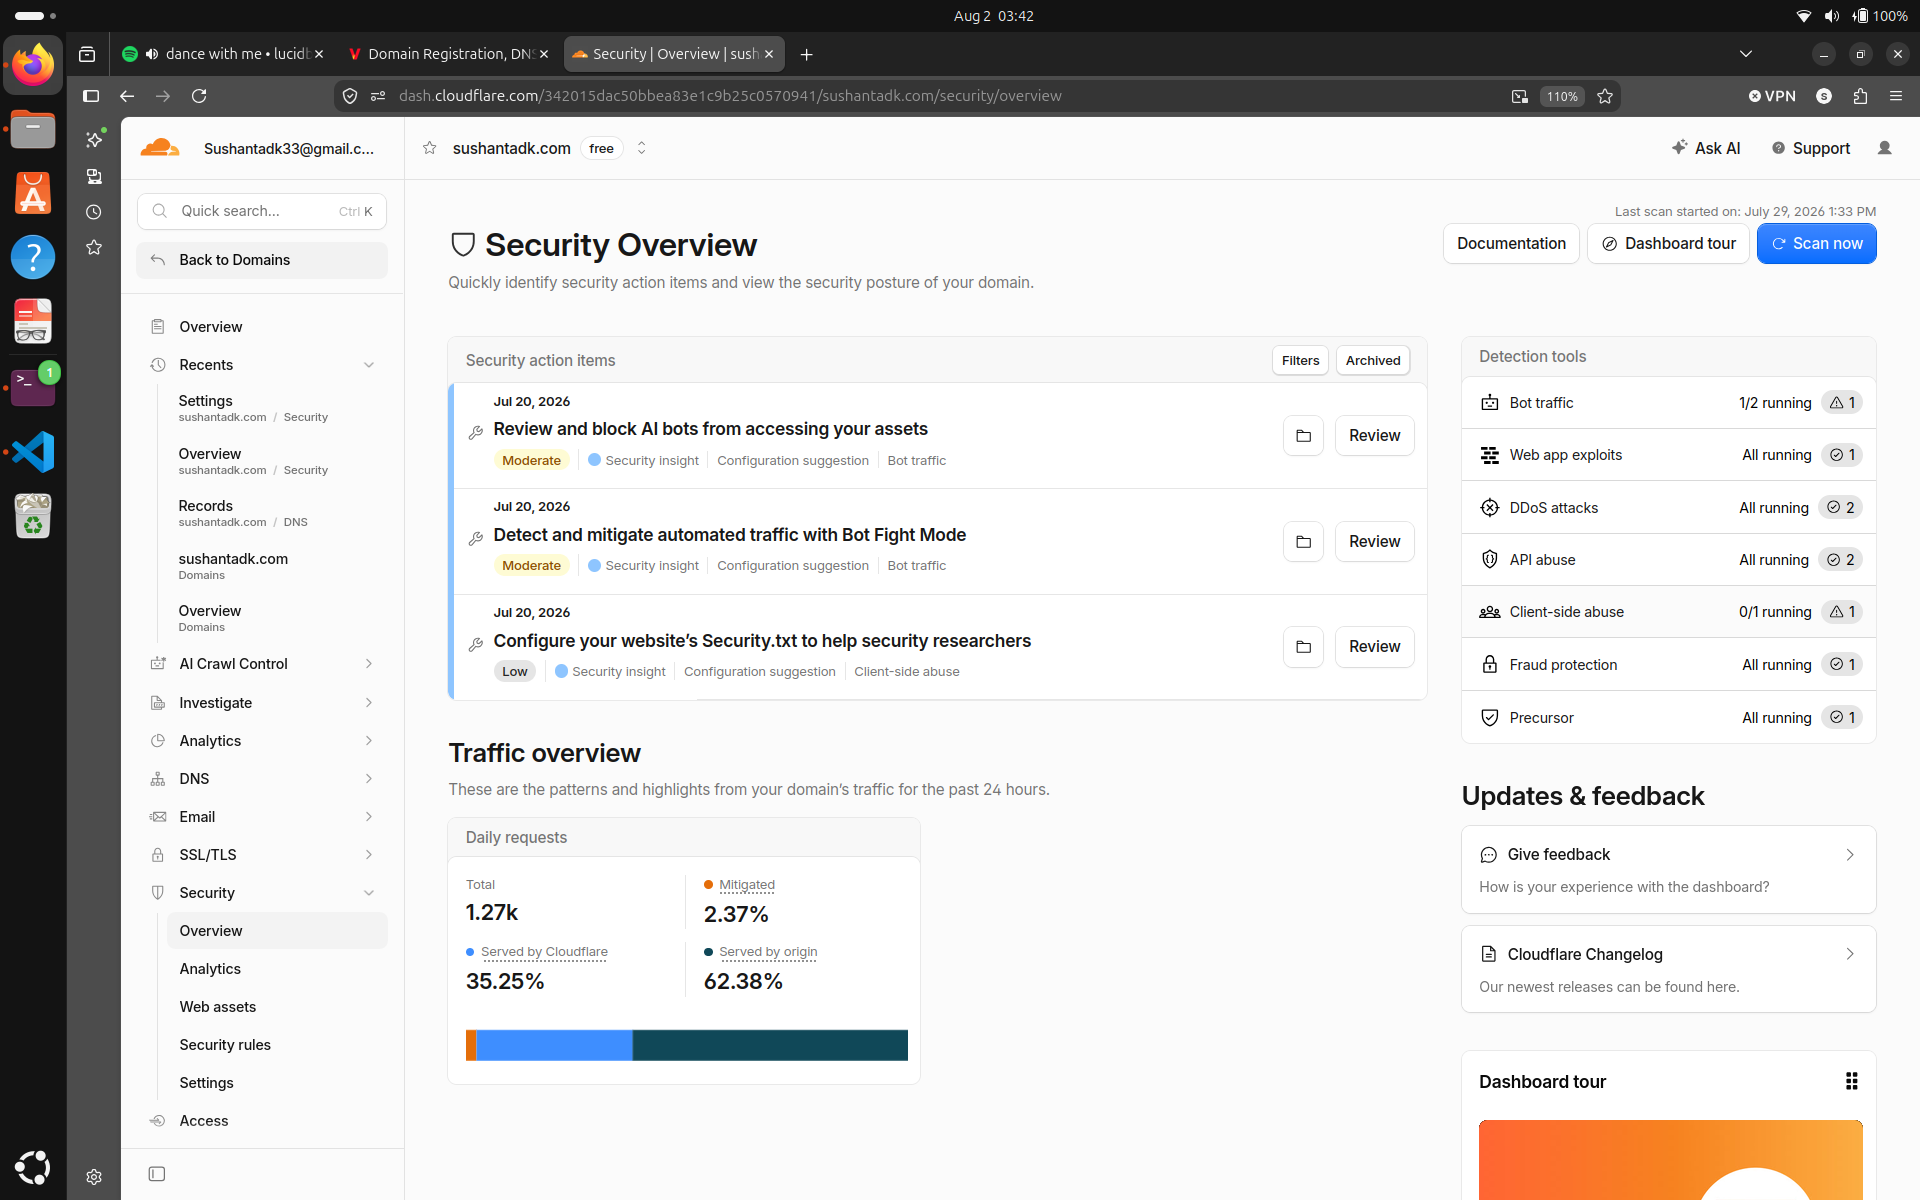
Let's move on to Security section. When you go to Overview, it gives you a list of recommendations to make your website more secure.
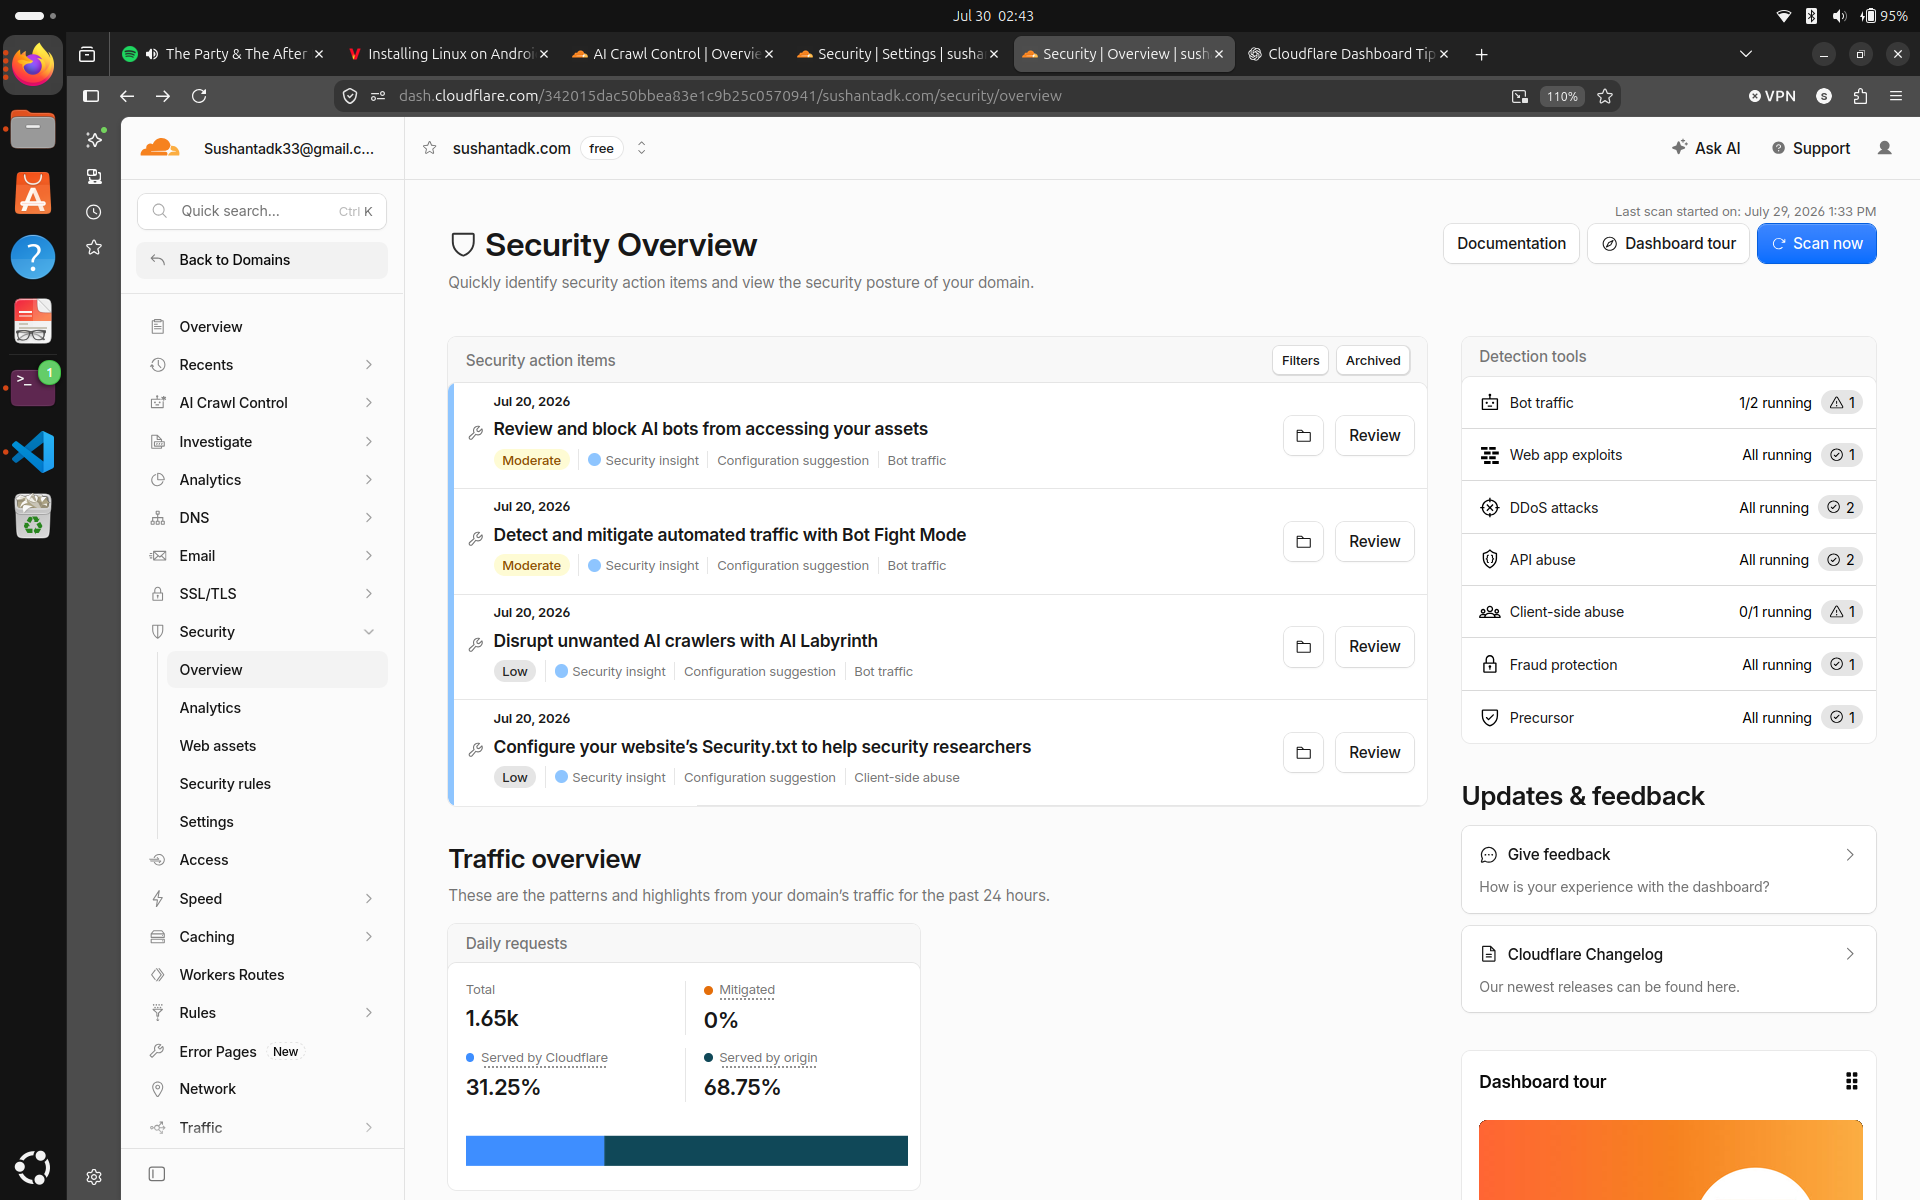
It gave me three recommendations on Bot traffic, and one on Client-side abuse (FYI, some recommendations don't go away even after you implement them). First, I will go ahead and disable access to bots on all pages for the first three recommendations. One thing that stood out amidst blocking access to bots was the Bot fight mode. It says it detects and challenges bot traffic on your domain. Let's enable it and purchase the tickets for the next fight.
The fourth recommendation is about security.txt. For our use case, security.txt is basically the instructions on how people can contact us regarding the security info on our website. Let's go to Review->Go to configure Security.txt. Click on the pen icon next to configurations. Configure it as follows:
- Contact -> mailto:yourEmailAddress
- Expires -> dateUntillTheInfoOnSecurityTxtWillBeValid
- Canonical -> https://awesomecoolreader.com/.well-known/security.txt
- Preferred-Languages -> yourPreferredLanguage
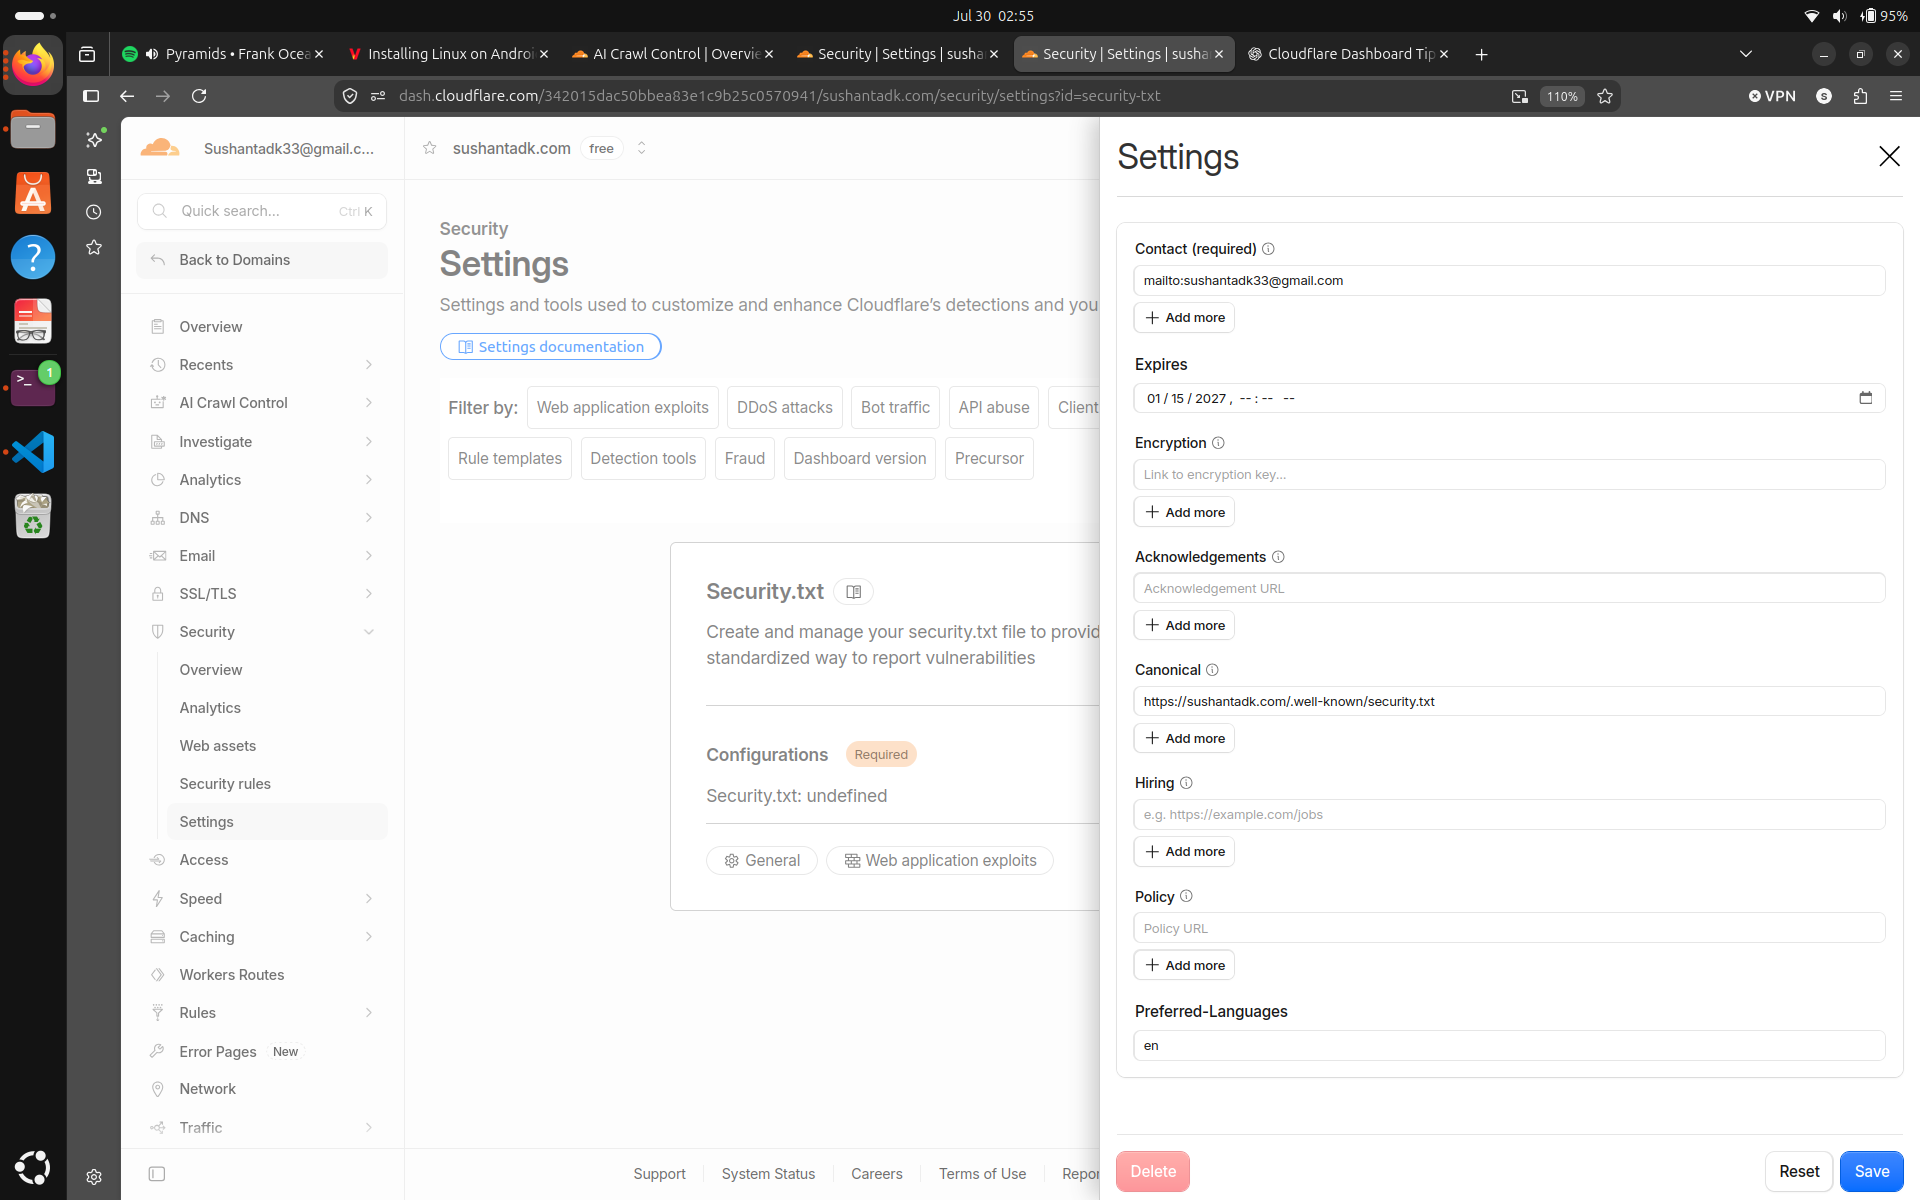
After configuring the file, enable Security.txt.
Let's try to access the security.txt file from a browser. Go to https://awesomecoolreader.com/.well-known/security.txt. You should see the information you just configured. This is a good way for security researchers to contact you if they find any vulnerabilities on your website.
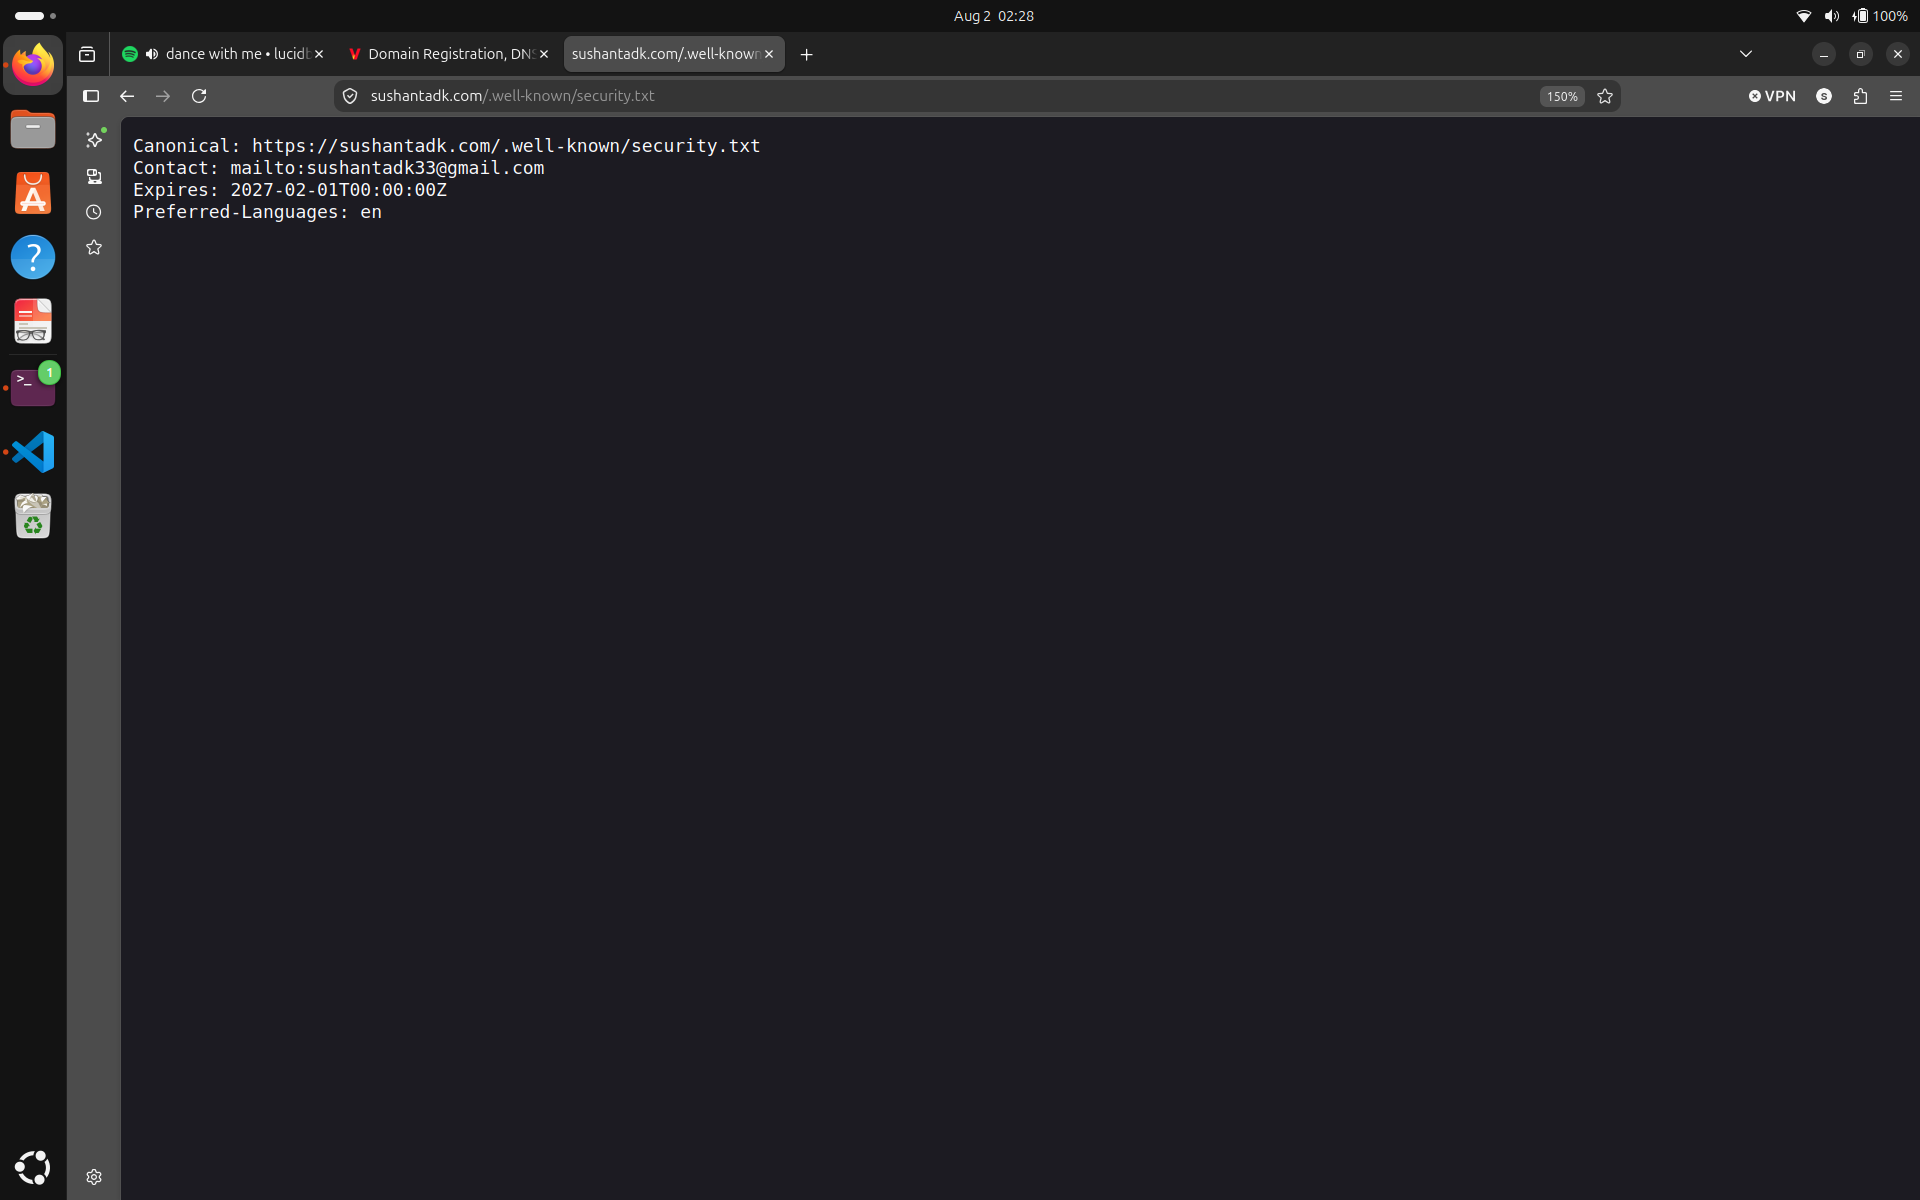
But wait, did Cloudflare just create a directory called .well-known on my server and put the security.txt file in it? How could it do that? Does it have my credentials? CALL THE COPS! Ah.. you can hang up I figured out what happened. Cloudflare is a reverse proxy, which means when a client makes a request to your website, it first goes to Cloudflare, which then forwards the request to your server. In this case, when you accessed https://awesomecoolreader.com/.well-known/security.txt, Cloudflare intercepted the request and served the security.txt file from its own servers instead of forwarding the request to your origin server. It means that even when your server is down, Cloudflare can still serve the security.txt file.
But who wants that? I want to serve the security.txt file from my own server. A self served file can be updated and modified easily, and it is independent of Cloudflare's configuration. In case you switch domain registrars, this approach ensures that your security.txt file remains accessible and up-to-date. So, let's create the .well-known directory on our server and put the security.txt file in it. It's very easy, just make a directory under static directory called .well-known, and put the security.txt file in it. I just copied and pasted the content from Cloudflare's security.txt file, and added some additional information. After creating the file, disable Security.txt on Cloudflare.
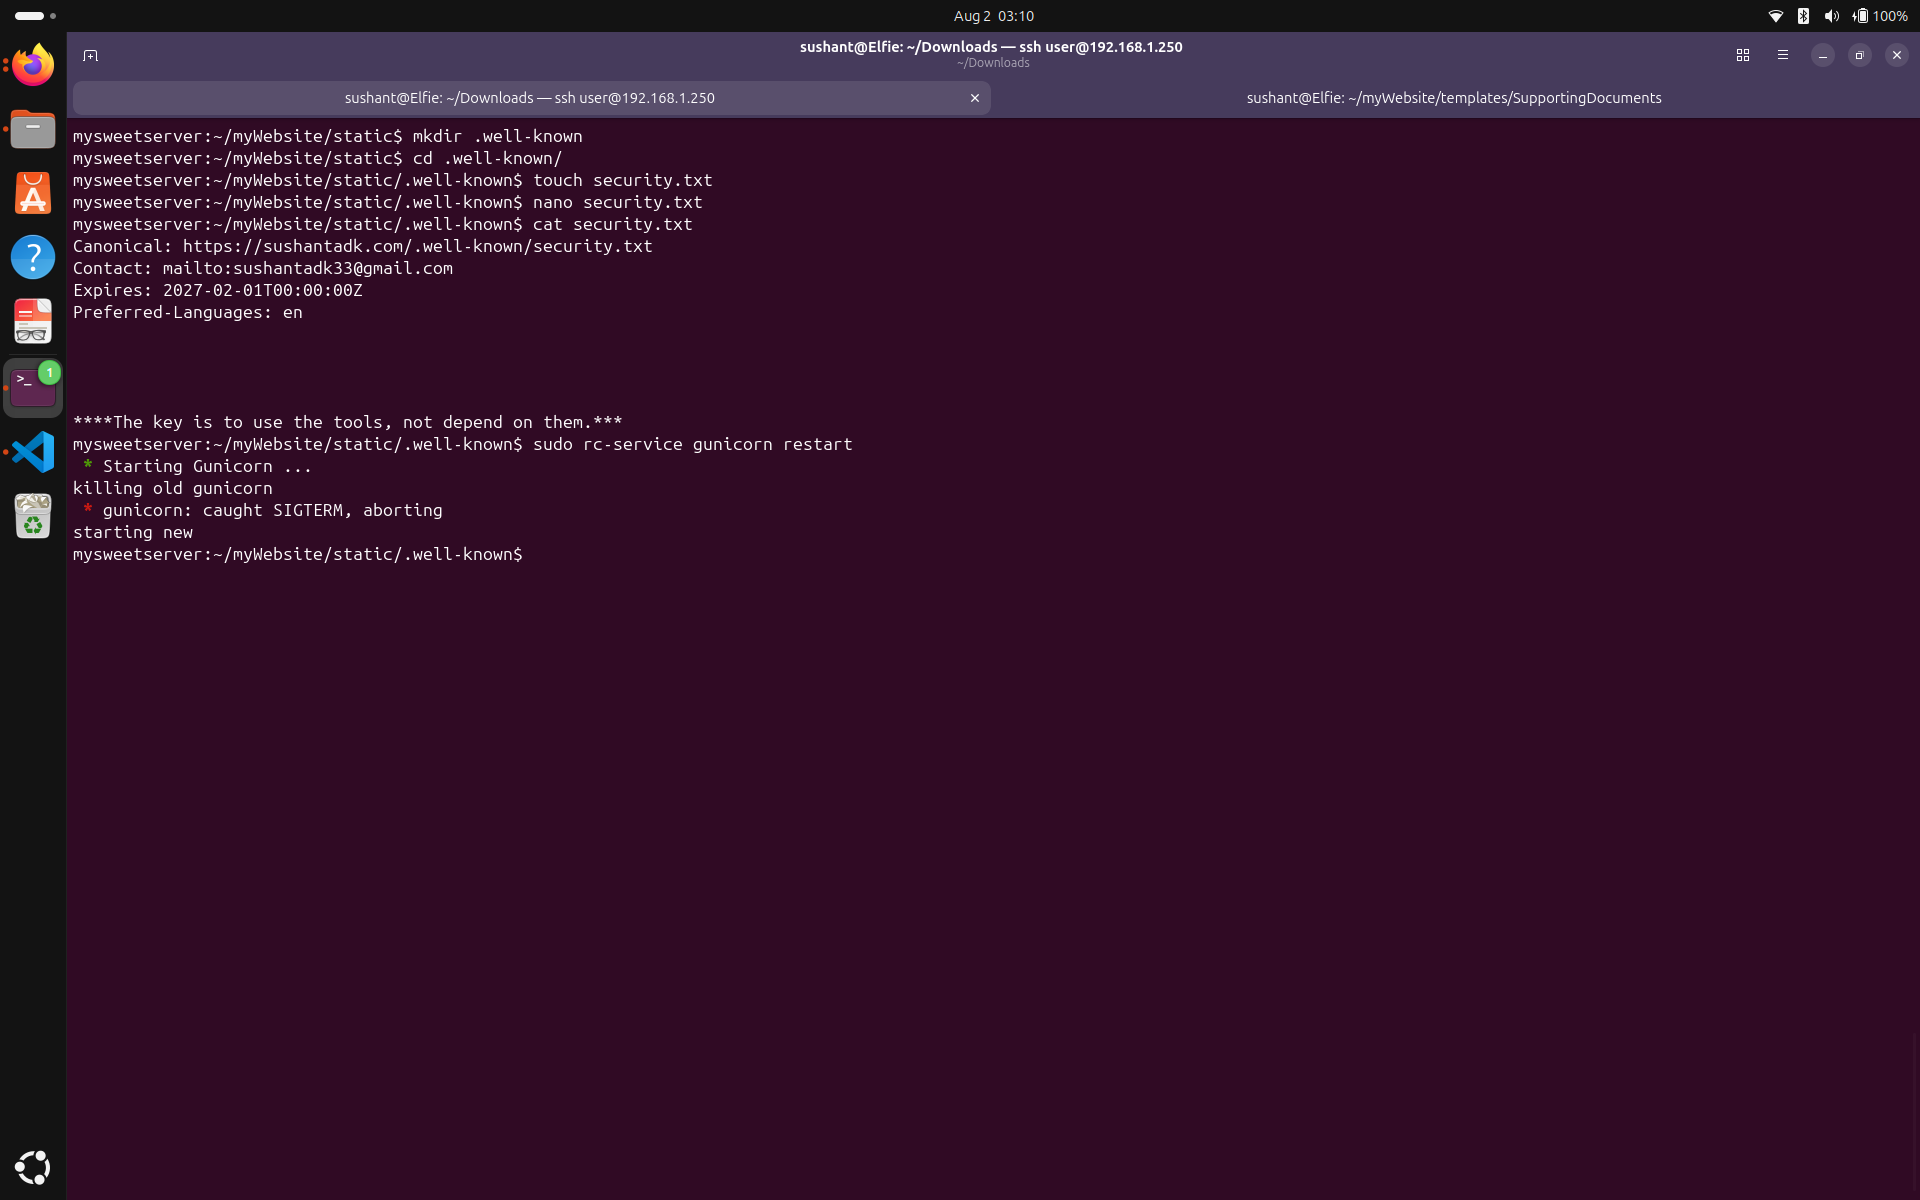
Now, when I access https://awesomecoolreader.com/.well-known/security.txt, I see the file served from my own server. This is a better approach because it gives me more control over the content and ensures that it remains accessible even if I change domain registrars in the future.
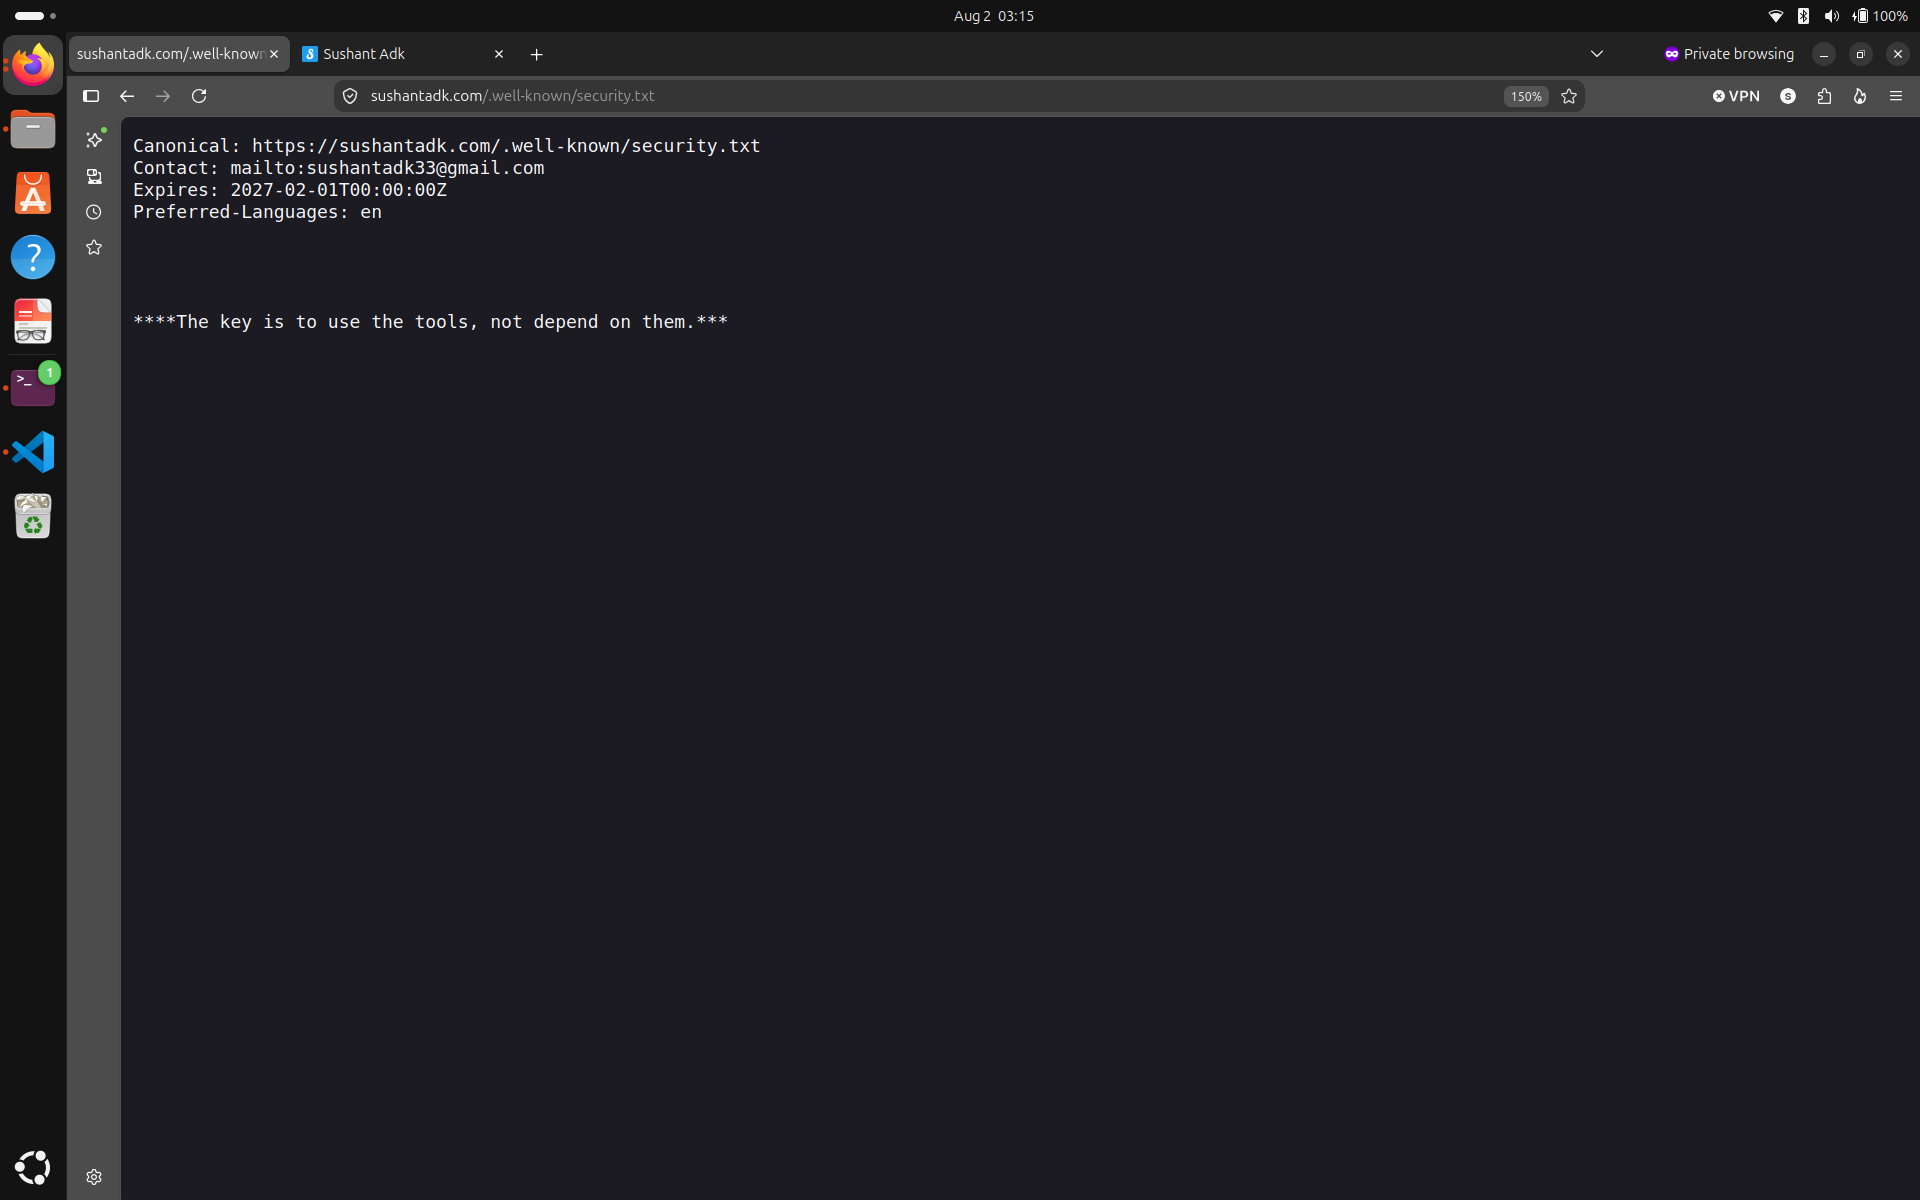
A little python coding went along with it but it is out of scope for this document. So let's move on.
Still on Security overview, on the right sidebar, you can see that detection tools are protecting your website against things like bot traffic, web app exploits, DDoS attacks, etc. I noticed the tool, client side abuse, showing a danger icon. Clicking on it, I was presented with an option to enable Contionous script monitoring to detect changes to JavaScript files on my website. Yes Please!
Next, Security rules. On the free plan, it looks like we can create 5 custom rules, and 1 rate limiting rule. Let's create a custom rule. Do the following:
- Rule name: ruleName
- Field: URI Path
- Operator: wildcard
- Value: /directoryThatOtherPeopleShouldn'tAccess/*. I chose /Executables/* because I don't want anyone to access anything on the Executables directory.
- Choose action: Block
- Status: Active
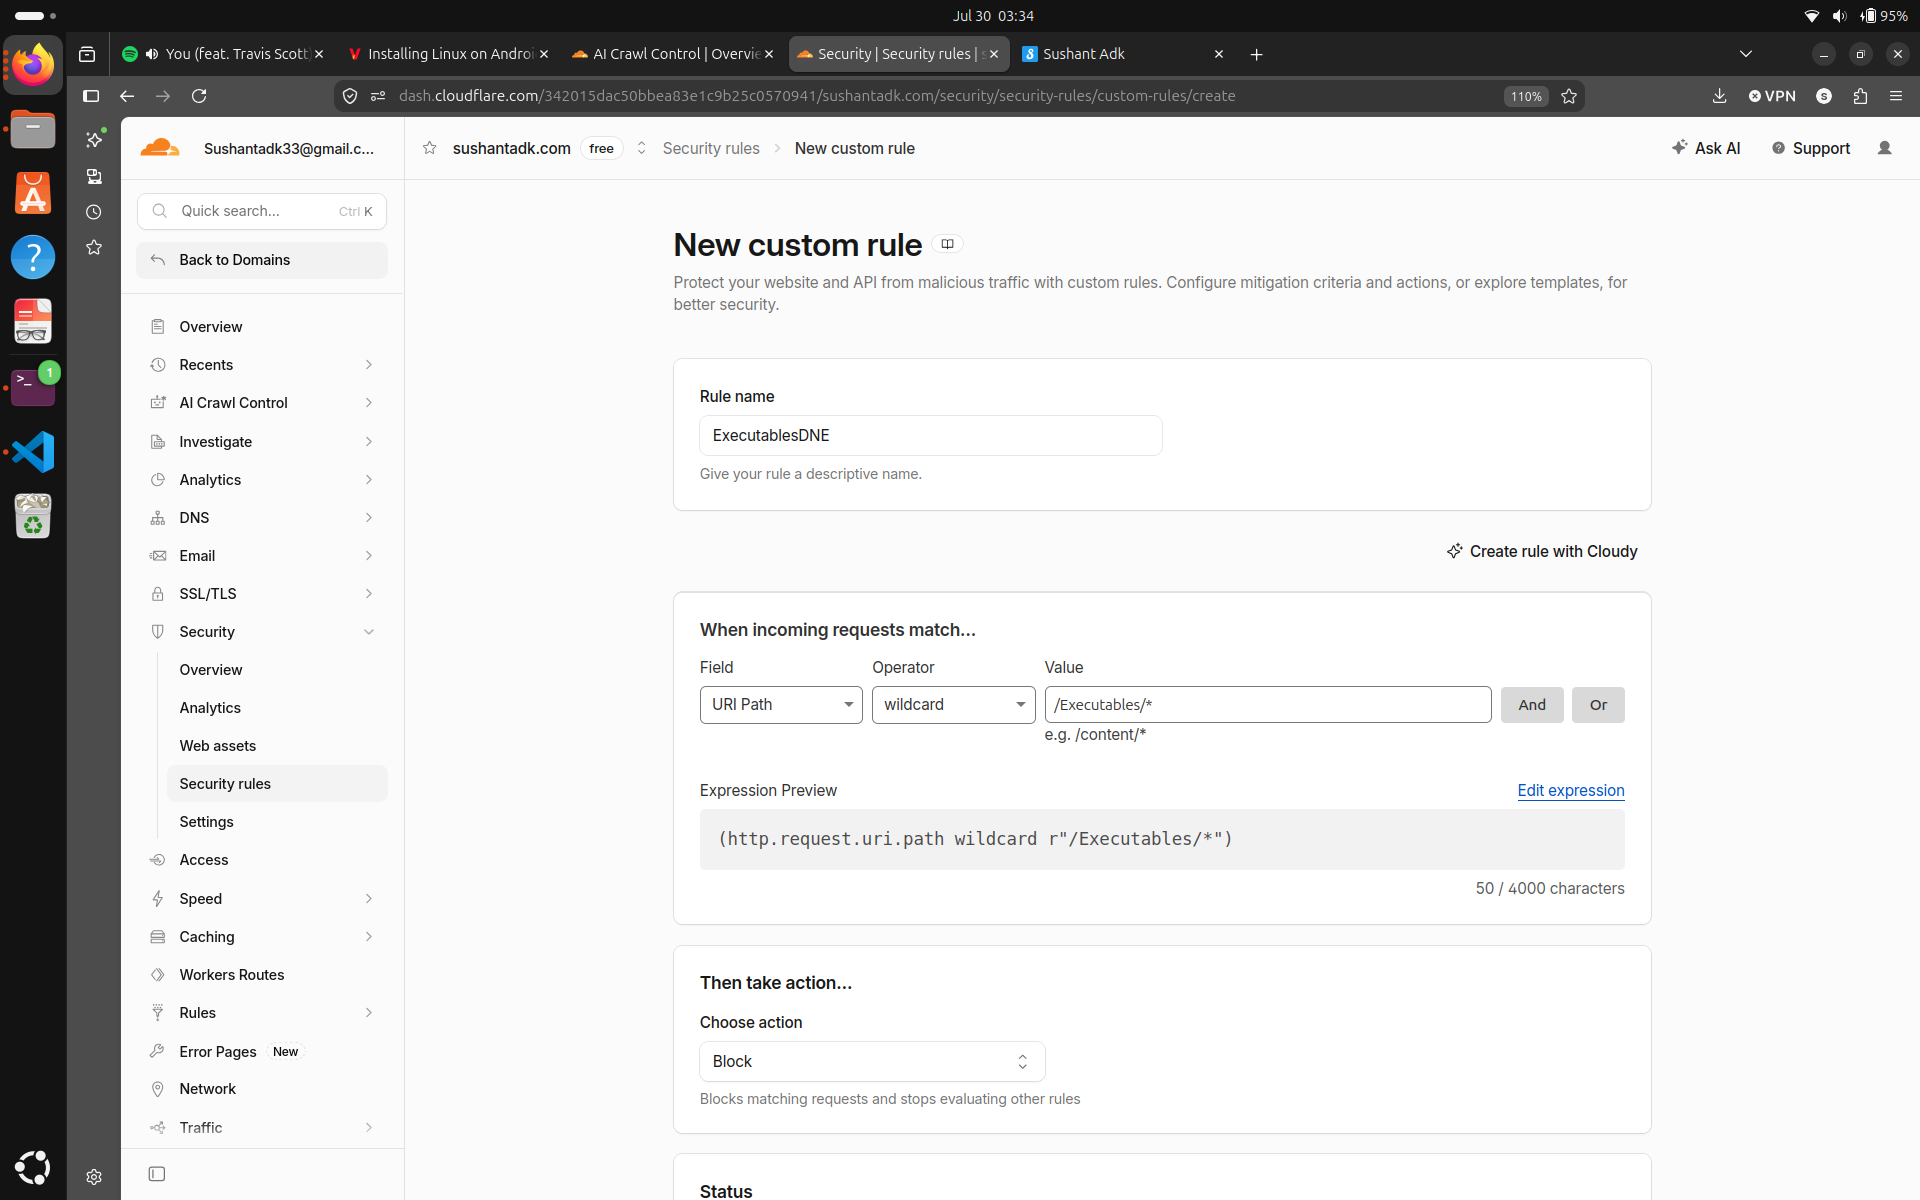
Then deploy the rule.
Now I will open a browser and try to access /Executables Directory.
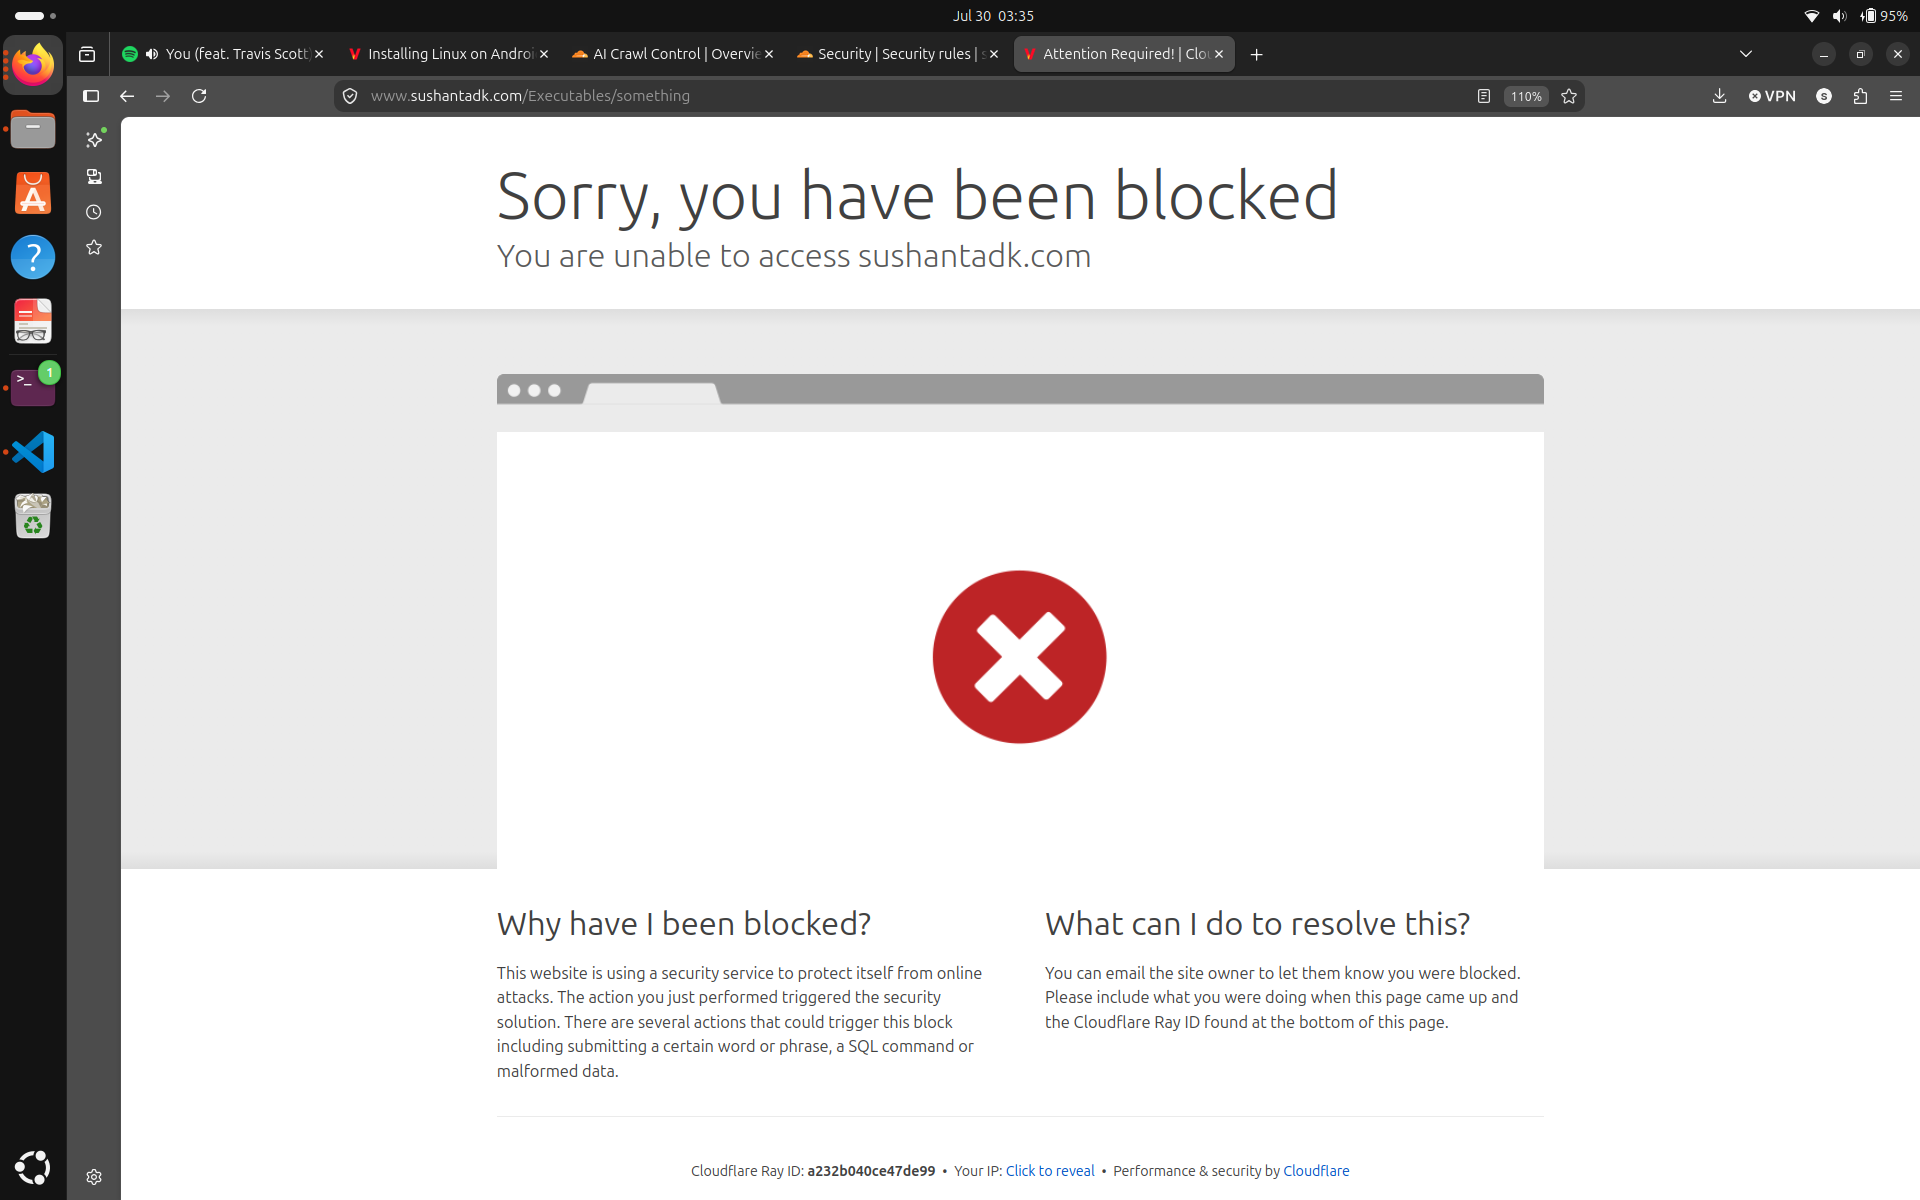
Now, users can no longer access resources in the /Executables directory. This additional layer of protection helps to keep sensitive directories inaccesible through the origin server's Apache configuration.
Now you can go and add more of the custom and rate limiting rules to fit your need. Anything you do here will be reflected instantly, so use caution when adding these rules and only create new rules if you really need them.
Security -> Settings has many settings, most of which are always active and some are reflecting our earlier change. Some of the settings that stood out for me were: Browser integrity check, which evaluates HTTP headers from visitors' browser for threats, and Leaked credential detection, which can help identify login attempts involving credentials that have appeared in known data breaches. We can go ahead and turn these on.
Rules
Next, under Rules, go to Overview. You can create different rules for redirect requests, transform requests or responses, and Cloudflare behaviours. I had no reason to put any of these rules in place but if you think you need one, you can create one from scratch or use an existing template.
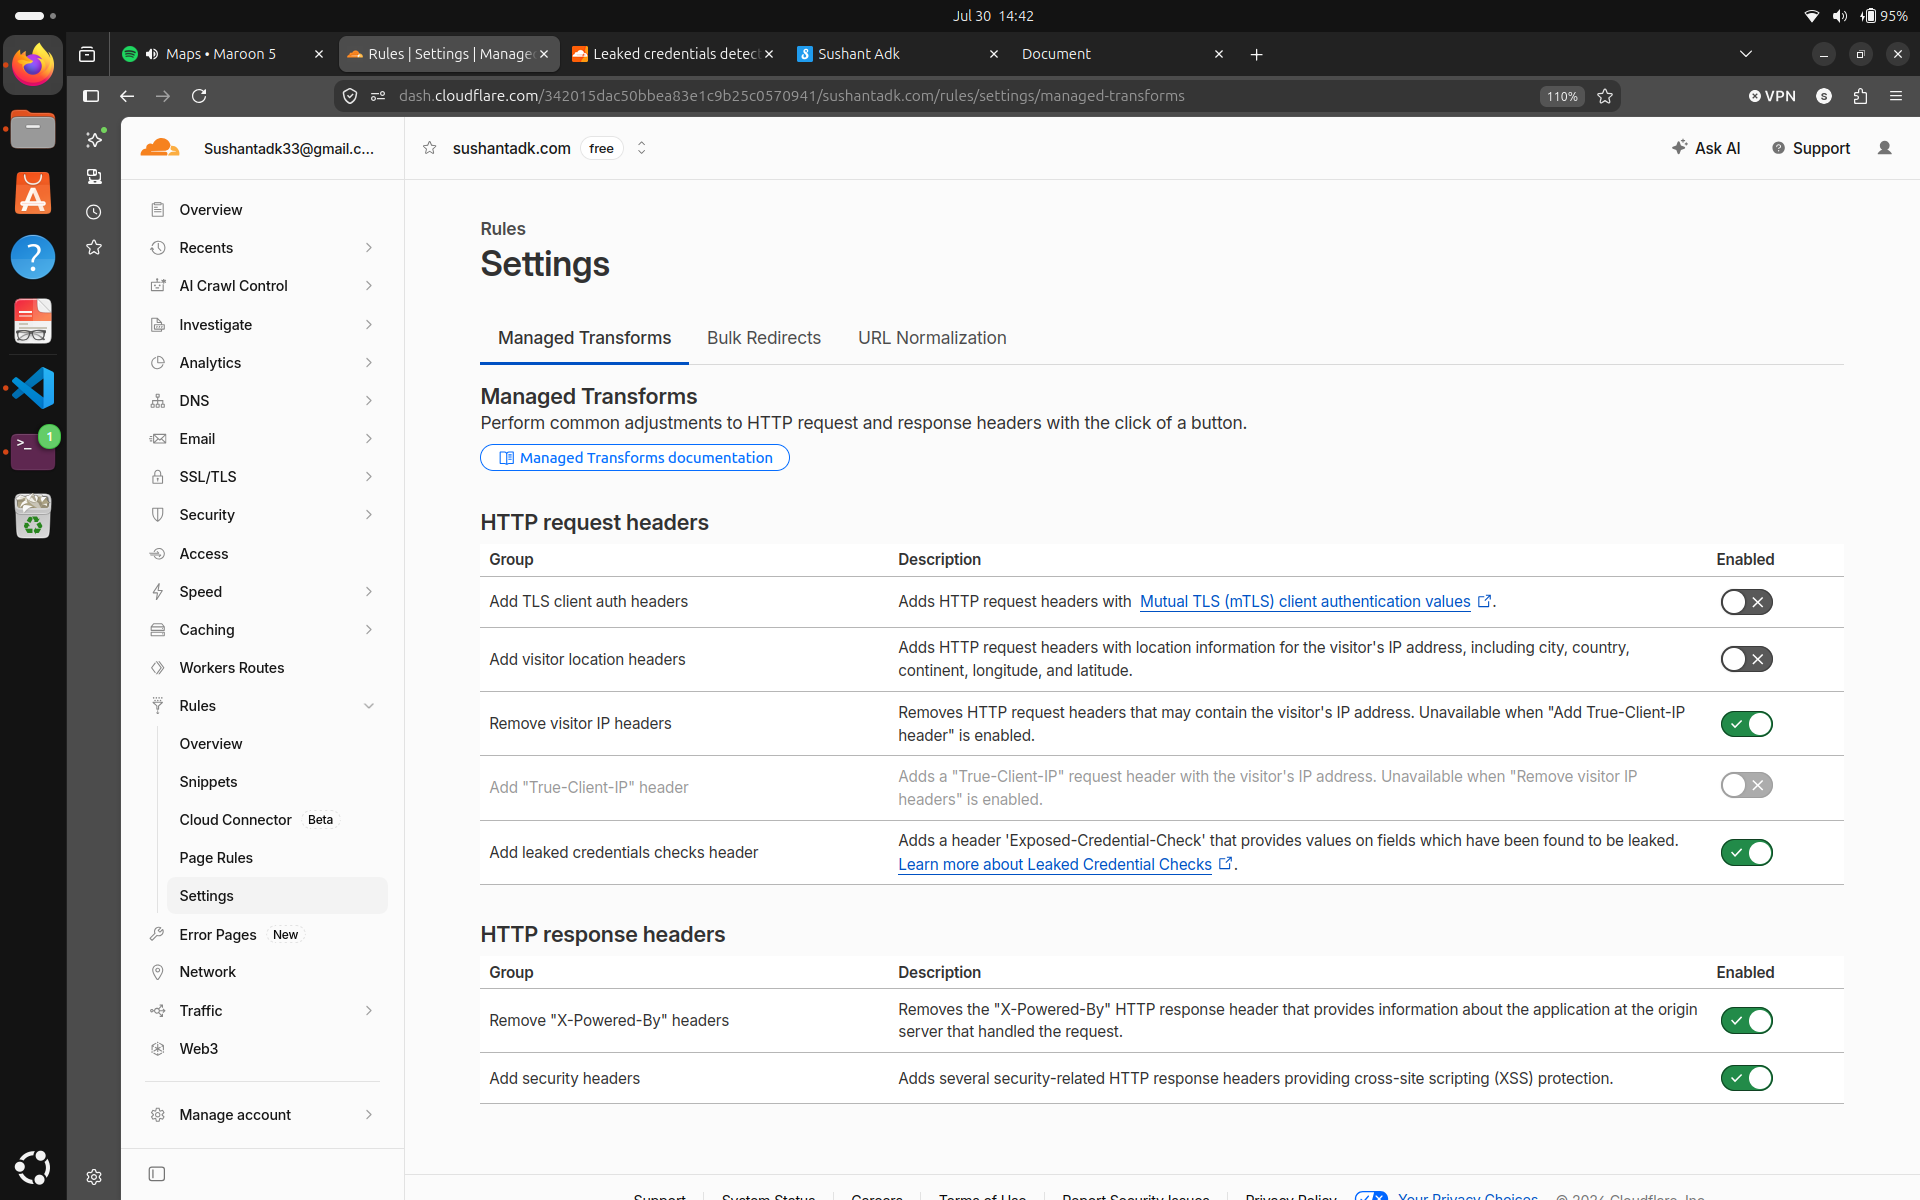
Let's take a look at Settings -> Managed transforms. All of the settings look useful, but for my website, I enabled only these ones:
- Remove visitor IP header. Because my website doesn't depend on visitor's IP address or origin.
- Add leaked credentials checks header.
- Remove "X-Powered-By headers". It removes information about the application my server is using.
- Add security headers. This one is definitely useful. I could tell.
Still under settings, go to URL Normalization, and turn 'Normalize URLs to origin' on. If a client makes a request using a non-normalized URL, such as /./products/ or /products/%2E%2E/item, Cloudflare will normalize the URL before sending it to the origin.
That was all!
These are all the settings that were applicable to my website given its current scope. I intentionally didn't configure every Cloudflare feature available because security configuration should be driven by the requirements of the application rather than by the number of available options.
As the website grows, I'll revisit the features I noted and configure them when they become relevant.
Moving Forward
To use this domain name to serve a website from a server, visit:
My Website Initial Configuration
Building a server